
How to Replace Front Brake Pads and Rotors on a 2015 Chevy Tahoe

Replacing the front brake pads and rotors on a 2015 Chevrolet Tahoe is a very manageable DIY repair, but on an older truck, the job can become considerably harder because of rust, seized hardware, frozen wheels, and stuck rotors.
That was exactly the case on my Tahoe.
The basic brake replacement itself was straightforward. The real work came from dealing with extremely tight caliper bracket bolts, an aluminum wheel that had corroded onto the hub, and a rotor that was frozen in place.
This guide walks through the complete process from wheel removal through final torque, including the problems you are most likely to encounter on a high-mileage or rust-belt Tahoe.
Watch: Complete 2015 Chevy Tahoe Front Brake and Rotor Replacement
Vehicles This Procedure Applies To
This article is based specifically on a 2015 Chevrolet Tahoe.
The overall procedure is also very similar on many:
2015–2020 Chevrolet Tahoe
2015–2020 Chevrolet Suburban
2015–2020 GMC Yukon
2015–2020 GMC Yukon XL
Certain related GM 1500 trucks using the same front-brake architecture
GM parts catalogs show substantial parts overlap across Tahoe, Yukon, Suburban and related GM trucks. For example, GM front pad kit 84320501 is listed for 2015–2020 Tahoe, Suburban, Yukon and Escalade applications.
However, do not order parts based solely on model year. GM used different brake packages, including police, heavy-duty and other configurations, and rotor listings can differ by equipment package.
Always verify pads and rotors by VIN before ordering.
Brake Pads: https://amzn.to/4xvYgkT
Front Rotors: https://amzn.to/46tDYxh
Verify fitment for your exact VIN/brake package before ordering.
Tools and Supplies
For this job I recommend having:
Brake Pads: https://amzn.to/4xvYgkT
Front Rotors: https://amzn.to/46tDYxh
Torque Wrench: https://amzn.to/4yFYs1J
Breaker Bar: https://amzn.to/4AvuAHo
Brake Caliper Grease: https://amzn.to/4AkHp7m
Permatex Blue Threadlocker: https://amzn.to/4rj4rY3
Anti-Seize: https://amzn.to/4hxTo95
Brake Cleaner: https://amzn.to/3Vd02tB
Wire Brush: https://amzn.to/46niaDB
C-Clamp: https://amzn.to/4hsDeia
Jack Stands: https://amzn.to/4yh73bL
1. Safely Raise the Front of the Tahoe
Park the Tahoe on a hard, level surface.
Set the parking brake and chock the rear wheels.
Before lifting the vehicle, slightly loosen all six front lug nuts using a 22 mm socket.
Raise the front of the Tahoe and support it securely with jack stands.
Never perform brake work with the vehicle supported only by a hydraulic jack.
How to Safely Lift the Front of a Chevy Tahoe onto Jack Stands
2. Remove the Front Wheel
Remove all six lug nuts with the 22 mm socket and pull the wheel off.
Normally this takes seconds.
On my Tahoe, however, one factory aluminum wheel was completely frozen to the hub.
If the Wheel Is Stuck
This is very common where road salt is used.
The aluminum wheel center bore can corrode tightly against the steel hub pilot.
First, reinstall two or three lug nuts loosely so the wheel cannot suddenly fall off.
Apply penetrating oil around the center hub opening.
Try striking the tire sidewall from behind with a dead-blow hammer.
If that does not work, place a 2×4 against the inside tire sidewall and strike the wood firmly with a 3–5 lb sledgehammer.
Rotate the wheel and repeat from different positions.
Do not strike the aluminum rim directly.
Once the wheel comes off, clean corrosion from the hub pilot before reassembly.

3. Remove the Brake Caliper
The Tahoe uses a dual-piston front caliper.
Remove the two caliper guide-pin bolts from the rear of the caliper.
Your setup uses approximately 19 mm hardware.
I like to loosen the lower bolt first but leave it threaded a few turns while removing the upper bolt. This keeps the caliper from unexpectedly dropping.
Once both bolts are removed, slide the caliper away from the rotor.
Do not allow the caliper to hang from the flexible brake hose.
Support it on the suspension or hang it with wire or a caliper hook.
Also make sure you do not pinch or pull on the ABS wiring.
4. Remove the Old Brake Pads
Pull the inner and outer pads from the caliper bracket.
If the pads slide out easily, great.
If they are difficult to remove or require a pry bar, pay attention.
That often means rust has built up under the stainless pad abutment clips, squeezing the pad ears and preventing them from sliding freely.
That was an important issue in the Yukon transcript as well: the pad sticking in the bracket was a clue that the bracket needed additional rust removal.
This needs to be fixed before installing the new pads.
5. Remove the Caliper Bracket
This was one of the hardest parts of my Tahoe brake job.
The caliper bracket is secured to the steering knuckle by two large bolts.
Use an 18 mm six-point socket.
These bolts can be incredibly tight.
Mine would not move with a normal ratchet.
I eventually freed them using a long breaker bar and considerably more leverage.
How to Break Free Frozen Caliper Bracket Bolts
If the Caliper Bracket Bolt Will Not Move
Try, in order:
Six-point 18 mm impact socket
Long 1/2-inch breaker bar
Penetrating oil
Longer leverage
High-torque impact wrench
Keep the socket squarely seated on the bolt so you do not round the head.
Once both bolts are removed, lift the caliper bracket away from the rotor.
6. Remove the Rotor Retaining Screw
A small Torx screw holds the rotor to the hub during assembly.
Use a T30 Torx bit.
Be careful because these screws can strip.
The screw does not carry braking load while driving. Once the wheel is installed, the lug nuts clamp the rotor firmly against the hub.
One side of my Tahoe was actually missing the retaining screw entirely.
That does not prevent the vehicle from being driven, although replacing the screw makes future brake service easier.
The replacement is commonly listed as an M8 × 1.25 × 20 mm countersunk rotor screw, such as GM 11609271 / equivalent aftermarket hardware.
The retaining screw is only lightly tightened.
For this setup, approximately:
106 lb-in / about 9 ft-lb is appropriate.
Replacement rotor retaining screw: https://amzn.to/46nAfkZ
7. Remove the Old Rotor
In a rust-free environment, the rotor may simply slide off.
Mine did not.
The rotor was rusted solidly to the hub.
How to Remove a Frozen Rotor
Apply penetrating oil around the center hub pilot.
Strike the rotor hat between the wheel studs with a heavy hammer.
Rotate the rotor and strike it at several positions.
Avoid striking the wheel studs.
You can also strike from the rear where accessible, being careful not to damage the dust shield.
Eventually the rust bond will break and the rotor will come loose.
[IMAGE INSERT]Rotor frozen onto hub. ALT:Stuck front brake rotor on 2015 Chevy Tahoe
This is another excellent potential standalone YouTube video:
How to Remove a Rotor Frozen to the Hub
8. Clean the Hub Thoroughly
This step is easy to skip and extremely important.
The new rotor must sit completely flat against the hub.
Rust scale trapped between the rotor and hub can create lateral runout, which can eventually feel like brake pedal pulsation or vibration.
Use a wire brush, sanding disc or abrasive pad to clean:
The flat hub face
The center hub pilot
Any heavy corrosion around the rotor mounting surface
The surface should be clean and relatively smooth.
9. Apply a Very Thin Layer of Anti-Seize
After cleaning the hub, I applied an extremely thin layer of anti-seize.
The goal is not to coat everything heavily.
Apply only a light film to the areas where the rotor contacts the hub, particularly the center pilot.
Avoid getting anti-seize on:
Wheel studs
Lug nut seats
Brake rotor friction surfaces
Brake pads
Too much compound can squeeze out and contaminate surrounding components.
A barely visible film is enough.
10. Install the New Rotor
Slide the new rotor over the wheel studs.
Align the rotor retaining screw hole with the threaded hole in the hub.
Install the T30 retaining screw and snug it to approximately 9 ft-lb.
If the rotor does not have a retaining screw installed, you can temporarily install two lug nuts backward to hold the rotor tightly against the hub while completing the brake assembly.
Should New Rotors Be Cleaned?
If your new rotors have an oily protective coating, clean both sides thoroughly with brake cleaner before installation.
Some coated rotors are designed to be installed without removing the coating, so follow the rotor manufacturer's instructions.
If you live in a rust-prone area, fully coated rotors are worth considering for future brake jobs because they better protect the rotor hat, edges and internal vanes from corrosion.
Front rotors: https://amzn.to/46tDYxh
11. Clean the Caliper Bracket
Remove the old stainless pad clips.
Inspect the metal underneath them carefully.
Rust underneath these clips can lift the clips upward and squeeze the brake pad ears.
Use a wire brush or sanding disc until the pad-contact areas are clean and flat.
This was directly evident in the reference transcript: pads that had to be pried out indicated corrosion buildup under the hardware.
If the new pad clips will not fully seat, keep cleaning.
Do not force them onto a heavily rusted bracket.
12. Install the New Pad Clips
Your Tahoe may use the later-style clips with pad-spreading fingers.
The small spring tabs help push the pads slightly away from the rotor when the brake pedal is released.
GM parts listings identify a Tahoe bracket configuration with “spreading fingers pad clips.”
Match the new hardware to the original clips and make sure each clip snaps completely into the bracket.
13. Lubricate the Correct Brake Contact Points
Brake grease belongs only on metal-to-metal movement/contact areas.
Apply a very thin layer of proper synthetic or silicone brake grease to:
Caliper slide pins
Pad ears where they slide in the stainless clips
Piston contact areas on the rear of the inner pad, if recommended
Caliper contact points on the outer pad
Do not put grease on:
Pad friction surfaces
Rotor braking surfaces
Wheel studs
Caliper bracket bolt threads
And do not use anti-seize as caliper grease.
14. Service the Caliper Slide Pins
Pull the slide pins out one at a time so you do not mix their positions.
Wipe away the old grease.
Inspect the pins for rust, pitting or contamination.
If necessary, clean the bore and inspect the rubber boot.
Apply fresh brake-caliper grease to the smooth pin surface and work the pin back into the boot.
The pin should move smoothly.
Do not overpack the bore with grease.
15. Reinstall the Caliper Bracket
Position the bracket over the rotor.
Clean the large bracket-bolt threads before installation.
I used Permatex Medium Strength Blue Threadlocker Gel on the bracket bolts.
Apply a small amount across several threads — you do not need to flood the bolt.
Start both bracket bolts by hand before tightening.
Torque the caliper bracket bolts to the specification for your exact Tahoe/Yukon brake package. Do not assume all 2015–2020 models use the same value. Verify by VIN/service information.
16. Install the New Brake Pads
Install the inner and outer pads into the new clips.
They should slide into the bracket without needing excessive force.
If the pads bind, remove them and clean more rust from under the clips.
Do not assume a tight fit is normal.
A pad that cannot slide can remain partially applied, causing:
Uneven wear
Excess heat
Pulling
Premature rotor damage
Pay attention to the wear indicator or “squealer.”
For your Tahoe pad arrangement, install the pads in the same inner/outer orientation as the originals and follow the pad manufacturer's specified wear-indicator location.
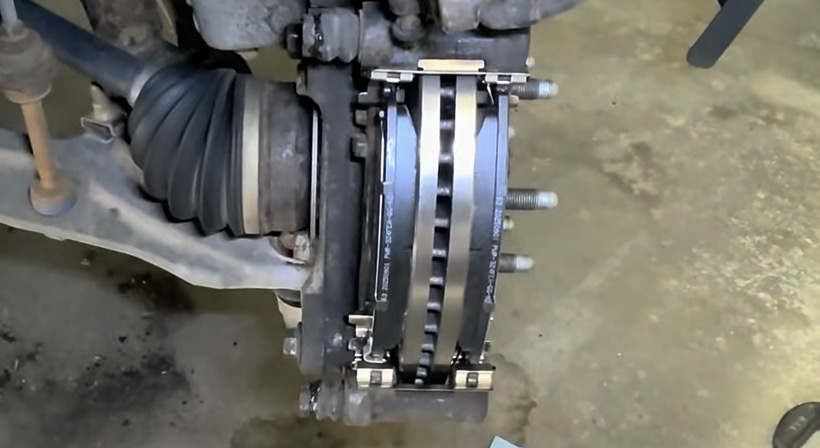
17. Compress the Dual Caliper Pistons
The front caliper has two pistons.
Before the caliper can fit over the thicker new pads, both pistons must be pushed back into the caliper.
A proper dual-piston brake tool works best.
You can also place an old brake pad across both pistons and use a large C-clamp. That is what I did.
Push the pistons inward slowly and evenly.
Watch the brake-fluid reservoir under the hood because the fluid level will rise as the pistons retract.
Do not press one piston in aggressively while allowing the other to push outward.
Dual-piston caliper compressor: https://amzn.to/4h4JTxK
18. Reinstall the Caliper
Slide the caliper over the new pads and line it up with the guide pins.
Make sure:
The brake hose is not twisted
The ABS wire is not pinched
The slide-pin boots are seated correctly
Install both guide-pin bolts by hand.
Do not put anti-seize or grease on the guide-bolt threads.
If anything is called for on the threads, use only the specified threadlocker/service procedure.
If the slide pin spins while torquing, hold the pin with the appropriate wrench.
As with the bracket bolts, use the torque specification for your exact vehicle/brake package rather than assuming all related GM SUVs use one universal number. I used 148 ft-lbs for my Tahoe.
The Tahoe specification is 74 ft-lb for the caliper-to-guide-pin bolts.
19. Reinstall the Wheel
Put the wheel back onto the hub.
Hand-start all six lug nuts.
Snug them in a star pattern.
Lower the Tahoe until the tire just contacts the ground enough to keep it from rotating.
Then torque the lug nuts in a cross/star pattern to:
140 ft-lb
Do not lubricate the wheel studs.
20. Pump the Brake Pedal Before Driving
This step is mandatory.
Because the caliper pistons were compressed, the first brake pedal application may travel much farther than normal.
Before moving the Tahoe:
Press and release the brake pedal several times until the pedal becomes firm.
Check the brake-fluid level.
Then inspect around both front brakes for anything abnormal.
21. Bed the New Brake Pads and Rotors
Follow the bedding procedure recommended by your pad manufacturer.
A typical process involves several moderate stops from approximately 30–40 mph with short cooling intervals between them.
Avoid immediately performing repeated panic stops unless the pad manufacturer specifically recommends that process.
Also avoid sitting stationary with the brake pedal clamped hard against extremely hot new rotors.
Problems I Ran into During This Brake Job
This job turned into a particularly useful DIY tutorial because almost every common rust-belt problem showed up:
Frozen Caliper Bracket Bolts
The 18 mm bracket bolts were extremely tight and required substantially more leverage than a standard ratchet could provide.
Related video:[How to Break Free Frozen Caliper Bracket Bolts]
Wheel Corroded to the Hub
The factory aluminum wheel would not come off even after repeated kicking and hammering.
The solution was a 2×4 against the inside tire sidewall and a heavy hammer.
Rotor Frozen to the Hub
The old rotor was also rust-bonded to the hub.
Penetrating oil plus repeated hammer blows around the rotor hat eventually freed it.
Missing Rotor Retaining Screw
One rotor had no T30 retaining screw.
The screw is useful during assembly but the wheel/lug nuts ultimately clamp the rotor to the hub.
Rust Under Pad Clips
Corrosion beneath the stainless pad hardware can prevent the pads from sliding freely.
Cleaning the bracket thoroughly before installing the new hardware is critical.
Choosing the Correct Pad Clips
Some brake kits include multiple clip styles.
Compare the replacement clips carefully against the original hardware and make sure they fully seat in the bracket.
Torque Reference
Because this article applies to more than one GM brake package, I would present the torque table carefully:
Component | Specification |
Wheel lug nuts | 140 ft-lb |
Rotor retaining screw | ~9 ft-lb / 106 lb-in |
Caliper guide bolts | Verify by VIN/brake package |
Caliper bracket bolts | Verify by VIN/brake package |
That last part is important. The Yukon transcript provides 77 ft-lb and 221 ft-lb respectively, but those figures should not automatically be applied to every Tahoe/Yukon configuration without verification.
Parts Fitment: Tahoe vs. Yukon
Many standard-brake parts are shared across this GM SUV generation.
GM lists front brake pad fitment across 2015–2020 Tahoe, and common GM pad kits also cross over to Yukon and Suburban.
However, there are different rotor and hardware configurations associated with:
Police packages
Heavy-duty brakes
Certain suspension packages
Other optional brake configurations
GM's own catalog separates some Tahoe police/heavy-duty brake configurations from standard applications.
Therefore:
Use the repair procedure as a general guide, but verify pads, rotors and torque specifications by VIN before ordering parts or tightening safety-critical hardware.
Final Thoughts
Replacing the front brakes and rotors on a 2015 Chevy Tahoe is not particularly complicated mechanically.
The biggest challenge on an older Tahoe is usually corrosion.
If you take the extra time to:
Clean the hub properly
Remove rust beneath the pad clips
Service the slide pins
Use brake grease only where appropriate
Keep anti-seize off the wheel studs
Use threadlocker where specified
Properly torque the hardware
Pump the brake pedal before driving
you can perform a very complete front brake service at home and potentially save several hundred dollars compared with having the job performed at a repair shop.
Watch the Complete Repair
If this guide helped you, subscribe to TC Tech for more real-world Tahoe, Jeep and DIY automotive repairs.
Related Articles and Videos
How to Safely Lift a Chevy Tahoe onto Jack Stands
How to Break Free Frozen Caliper Bracket Bolts
How to Remove a Wheel Stuck to the Hub
How to Remove a Rotor Frozen to the Hub
2015 Chevy Tahoe Rear Brake and Rotor Replacement
How to Diagnose an Ignition Coil on a Chevy Tahoe
2015 Chevy Tahoe Spark Plug Replacement


Comments